To present a Proof of Concept for the Multimedia Centre Augmented Reality mobile application (‘MMC AR’ app, for short), I have produced a range of deliverables.
Firstly, I have recorded a 10 minute presentation that would be given to stakeholders, such the Multimedia Centre staff and the Director of IT. Wider stakeholders such a members of funding panels as well as the University’s Health and Safety Officer would also need to be shown the presentation so that the mobile application’s viability can be considered from many angles. The presentation itself demonstrates the functionality of the application alongside accessibility features, funding opportunities, and development challenges. I have also taken the opportunity to explain how research in a prior module, DM7921: Design Research, has influenced the design process.
To supplement the presentation, I have attached a silent video of the four user-flows that are demonstrated within the presentation. This will allow stakeholders to view the flows in-full, where the presentation does not.
Appreciating that some stakeholders would prefer a hands-on demonstration of the mobile application, I have also provided links to all four user-flows. In real-life, I would aim to pitch the presentation face-to-face, offering a demonstration iPhone for users to interact with the four flows, created in Adobe XD. This will allow stakeholders the experienced the most realistic simulation that a high-fidelity prototype could provide.
Finally, I have included an academic poster, which I created for the University’s Academic Poster Exhibition, which illustrates the accessibility features within the mobile application.
This week I started development on a High Fidelity Prototype of the Multimedia Centre AR mobile application. I decided to work in Adobe XD on this occasion as I already had a working knowledge of the software, but had the opportunity to build on this by learning features that were new to me, such as integrating sections of video, and producing multiple ‘Flows’.
Flows
Before building the prototype, I had to take note of who the intended recipient would be. In my previous project, DM7917: Emerging Media, the recipient would be a client who was interested to try a hands-on simulation of the mobile application. For this reason, I developed the prototype so that they could tap on different menus and access each screen in a non-linear fashion.
However, for this module the inclusion of AR-based videos, meant that the prototype had to be accessed in a linear way, by interacting with/viewing each screen in sequential order – so I built four ‘Flows’ that the client could preview:
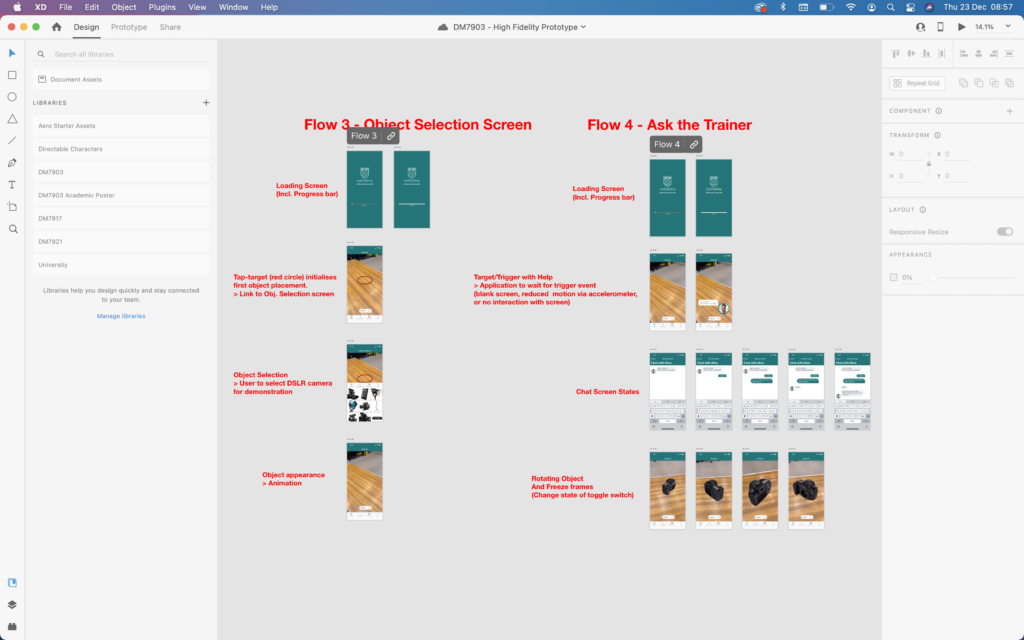
Flow 1 – Onboarding with VoiceOver, including Freeze Frame creation Flow 2 – Reviewing Freeze Frames Flow 3 – Object Selection Screen Flow 4 – ‘Ask the Trainer’ Feature
I planned to then screen-record myself accessing these flows and compile the footage into a Proof of Concept presentation later. This is an ideal way to control a pitch to a client, as I can explain the purpose of each flow to the client, stakeholders, and other developers, whilst clarifying any intricacies and ensuring that the prototype is demonstrated exactly as I intend it to be.
I have found prototyping with videos to be challenging, especially when the experience is required to be paused at specific moments, or if the user is expected to flow between screens at certain moments of video playback. Adobe XD does not allow for two timer triggers to be allocated to one screen/artboard. As a result, I’ve had to use the timer trigger to start video playback, then progress between screens manually when recording a video of each flow. This is not ideal, but does allow me to achieve a working prototype. One further set back is that if I do not time the progression between screens perfectly, videos reset to their first frame, causing a jarring effect that compromises the professional images of the prototype.
Above: A GIF animation of the jarring effect caused by video files resetting to their first frame
Use of Adobe XD Features
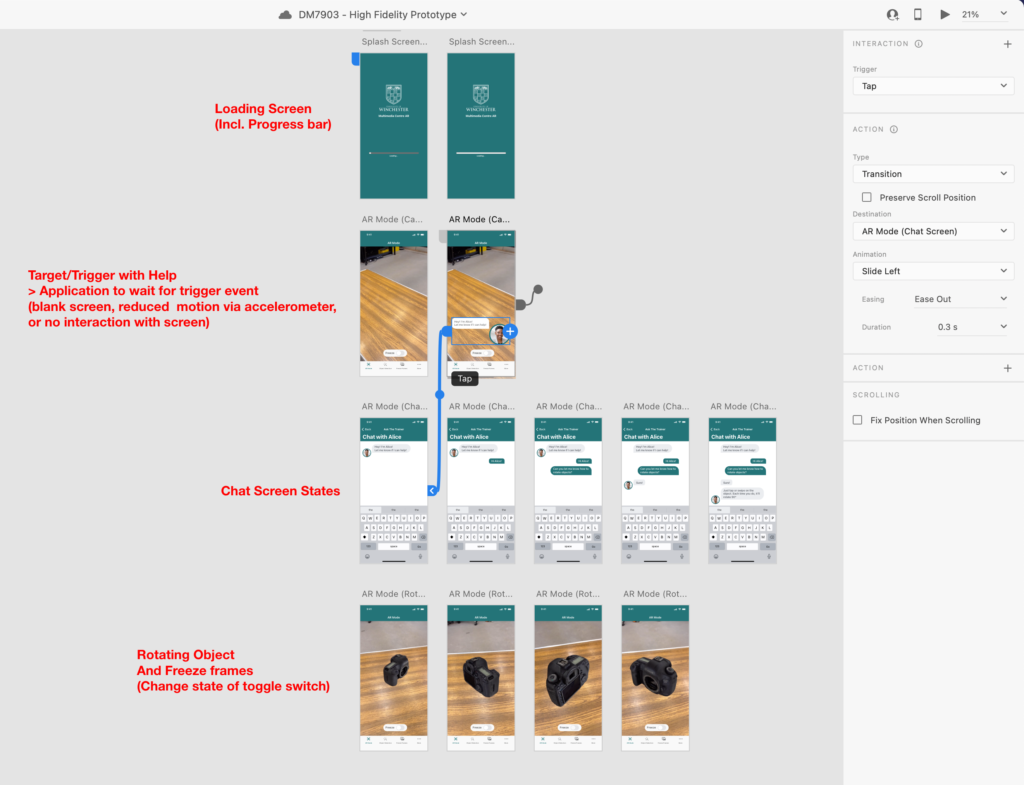
At the High Fidelity stage of the prototyping process, I could turn my attention to transition animations between screens/artboards. These would provide subtle communication to the user, indicating the status of the mobile application. For example, the ‘Slide Left’ animation is shown to the user once the ‘Ask the Trainer’ function is triggered. The sliding-in animation should communicate that the user has only temporarily side-stepped from the AR experience, and that the AR experience will be restored once they return form their conversation with the Trainer.
Above: A GIF animation showing the ‘slide’ transition used to introduce the ‘Ask the Trainer’ UI
When required, the ‘Auto-Animate’ feature was used to create ‘menu drawer’ effects for the Object Selection and Freeze Frame screens. This animation allows the user to make use of app functionalities whilst not leaving the AR experience. I’ve also implemented this in such a way that these functionalities are within the ‘reachable zone’ of the users’ thumbs.
These ‘menu drawers’ were somewhat successful in the high fidelity prototype, but sometimes a dissolve animation was shown on playback despite ‘Auto-Animate’ being selected. I suspect that is a limitation of the software, as the ‘Auto-Animate’ option is already being used to continue the AR video across multiple screens/artboards, so when trying to apply it to a screen/artboard twice a dissolve animation is shown.
Another feature that was particularly useful was the ability to add ‘states’ to UI objects. I made use of this when creating the ‘Freeze / Thaw’ toggle switch. In Flow 1 I set the switch to it’s default ‘Off’ state so that it could be toggled to its ‘On’ state when demonstrating the Freeze feature. When toggled, the switch would illuminate green and move to the right-most position while also advancing the prototype to the next screen/artboard. This was the first time I had linked a rich feature with an outcome – in my previous projects the switches were useable but didn’t advance the prototype in any way.
Above: A GIF animation demonstrating the change in state of the ‘Freeze’ toggle switch
Similarly, I built on my knowledge of the ‘repeat grid’ tool when developing this prototype. Previously my knowledge was limited to using the functionality as a time-saving technique, producing many UI elements efficiently. However on this occasion I identified individual images within the repeat grids, making them tappable links to advance the prototype to the next screen/artboard. Two examples of this are the ‘Freeze frame’ drawer and the ‘Object Selection’ screen.
Above: A GIF animation demonstrating the Object Selection screen
Next Steps
When producing this high-fidelity prototype, I’ve tried to keep its purpose in mind throughout the entire process. As well as using the prototype to demonstrate a Proof of Concept to the University (including all potential stakeholders), the Adobe XD file may be used by developers to build and code the mobile application itself. For this reason, I’ve demonstrated how annotation could be provided with each screen/artboard, explaining how interaction between the user and app should work, as well as when certain changes in state should occur for UI elements.
Once I have compiled and presented each flow of this prototype to all stakeholders, I would then wait for instruction on any final amendments or queries to be resolved. Once the final approval is given, then hypothetically (if this brief were a ‘live’ one) I would work alongside the University’s marketing team to hand-off the high-fidelity prototype to an internal or external development team, providing them with relevant extracts of the University’s Branding guidelines alongside any files such as typefaces and graphics.
Links to Flows
Below are four hyperlinks to interactive presentation versions of each flow within the prototype. I have also provided a Youtube videos of the flows, and intend to demonstrate them within my final Proof of Concept.